
Advanced concepts
This chapter provides configuration concepts and techniques to enhance your network security.
This section includes the topics:
- Dual internet connections (redundant Internet connections)
- Single firewall vs. multiple virtual domains
- Modem
- FortiExtender
- DHCP servers and relays
- Assigning IP address by MAC address
- DNS services
- Dynamic DNS
- FortiClient discovery and registration
- IP addresses for self-originated traffic
- Administration for schools
- Replacement messages list
- Disk
- CLI Scripts
- Rejecting PING requests
- Opening TCP 113
- Obfuscate HTTP responses
Dual internet connections (redundant Internet connections)
Dual internet connection, dual WAN, or redundant internet connection refers to using two FortiGate interfaces to connect to the Internet. Dual internet connections can be used in three ways:
- Redundant interfaces, should one interface go down, the second automatically becomes the main internet connection
- For load sharing to ensure better throughput.
- A combination of redundancy and load sharing.
Redundant interfaces
Redundant interfaces, ensures that should your internet access be no longer available through a certain port, the FortiGate unit will use an alternate port to connect to the Internet.
Configuring redundant interfaces
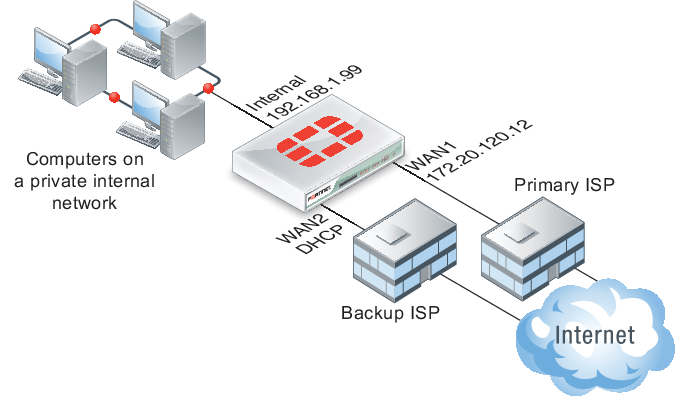
In this scenario, two interfaces, WAN1 and WAN2 are connected to the Internet using two different ISPs. WAN1 is the primary connection. In an event of a failure of WAN1, WAN2 automatically becomes the connection to the Internet. For this configuration to function correctly, you need to configure three specific settings:
- Configure a link health monitor to determine when the primary interface (WAN1) is down and when the connection returns
- Configure a default route for each interface.
- Configure security policies to allow traffic through each interface to the internal network.
Link Health Monitor
Adding a link health monitor is required for routing fail over traffic. A link health monitor will confirm the connectivity of the device’s interface
To add a link health monitor - web-based manager
- Go to Router > Static > Settings and select Create New.
For low-end FortiGate units, go to System > Network > Routing and select Create New.
- Choose a name.
- Select the Interface that will send probe requests.
- Specify the Gateway IP address if required, if not keep it set to 0.0.0.0.
- Make sure that Health Check is enabled.
- Set the Probe Type to Ping or HTTP.
- For the Server field, enter the IP address of a server that the FortiGate unit will send ping or http requests to.
- For the Ping Interval, enter the number of seconds to send ping requests.
- For the Failover Threshold, enter the number of lost pings or http requests is acceptable before the port is determined to be down.
- Make sure to enable Update Routing Table when Gateway Detection Status Changes.
- Enable Bring Down (Up) and select WAN2 interface.
- Select OK.
To add a link health monitor - CLI
config system link-monitor
edit “Example1”
set srcint <Interface_sending_probe>
set server <ISP_IP_address>
set protocol <Ping or http>
set gateway-ip <the_gateway_IP_to_reach_the_server_if_required>
set failtime <failure_count>
set interval <seconds>
set update-cascade-interface enable
set update-static-route enable
set status enable
end
Routing
You need to configure a default route for each interface and indicate which route is preferred by specifying the distance. The lower distance is declared active and placed higher in the routing table.
|
|
When you have dual WAN interfaces that are configured to provide fail over, you might not be able to connect to the backup WAN interface because the FortiGate unit may not route traffic (even responses) out of the backup interface. The FortiGate unit performs a reverse path lookup to prevent spoofed traffic. If no entry can be found in the routing table which sends the return traffic out the same interface, then the incoming traffic is dropped. |
To configure the routing of the two interfaces - web-based manager
- Go to Router > Static > Static Routes and select Create New Route or IPv6 Route.
For low-end FortiGate units, go to System > Network > Routing and select Create New Route or IPv6 Route.
- Set the Destination IP/Mask to the address and netmask of 0.0.0.0/0.0.0.0 if it’s an IPv4 route. If it’s an IPv6 route, set Destination IP/Mask to the address and netmask of ::/0
- Select the Device to the primary connection, WAN1.
- Enter the Gateway address.
- Select Advanced.
- Set the Distance to
10. - Select OK.
- Repeat steps 1 through 7 setting the Device to WAN2 and a Distance of
20.
To configure the IPv4 routing of the two interfaces - CLI
config router static
edit 0
set dst 0.0.0.0 0.0.0.0
set device WAN1
set gateway <gateway_address>
set distance 10
next
edit 0
set dst 0.0.0.0 0.0.0.0
set device WAN2
set gateway <gateway_address>
set distance 20
next
end
To configure the IPv6 routing of the two interfaces - CLI
config router static6
edit 0
set dst ::/0
set device WAN1
set gateway <gateway_address>
set distance 10
next
edit 0
set dst ::/0
set device WAN2
set gateway <gateway_address>
set distance 20
next
end
Security policies
When creating security policies, you need to configure duplicate policies to ensure that after traffic fails over WAN1, regular traffic will be allowed to pass through WAN2 as it did with WAN1. This ensures that fail-over will occur with minimal affect to users. For more information on creating security policies see the Firewall Guide.
Load sharing
Load sharing enables you to use both connections to the internet at the same time, but do not provide fail over support. When configuring for load sharing, you need to ensure routing is configured for both external ports, for example, WAN1 and WAN2, have static routes with the same distance and priority.
Further configuration can be done using Equal Cost Multiple Path (ECMP). For more information on ECMP and load sharing, see the Advanced Routing Guide.
Link redundancy and load sharing
In this scenario, both links are available to distribute Internet traffic over both links. Should one of the interfaces fail, the FortiGate unit will continue to send traffic over the other active interface. Configuration is similar to the Redundant interfaces configuration, with the main difference being that the configured routes should have equal distance settings.
This means both routes will remain active in the routing table. To make one interface the preferred interface, use a default policy route to indicate the interface that is preferred for accessing the Internet. If traffic matches the security policy, the policy overrides all entries in the routing table, including connected routes. You may need to add a specific policy routes that override these default policy routes.
To redirect traffic over the secondary interface, create policy routes to direct some traffic onto it rather than the primary interface. When adding the policy route, only define the outgoing interface and leave the gateway blank. This ensures that the policy route will not be active when the link is down.
Single firewall vs. multiple virtual domains
A typical FortiGate setup, with a small to mid-range appliance, enables you to include a number of subnets on your network using the available ports and switch interfaces. This can potentially provide a means of having three or more mini networks for the various groups in a company. Within this infrastructure, multiple network administrators have access to the FortiGate to maintain security policies.
However, the FortiGate unit may not have enough interfaces to match the number of departments in the organization. If the FortiGate unit it running in transparent mode however, there is only one interface, and multiple network branches through the FortiGate are not possible.
A FortiGate unit with Virtual Domains (VDOMs) enabled, provides a means to provide the same functionality in transparent mode as a FortiGate in NAT mode. VDOMs are a method of dividing a FortiGate unit into two or more virtual units that function as multiple independent units. VDOMs can provide separate security policies and, in NAT mode, completely separate configurations for routing and VPN services for each connected network. For administration, an administrator can be assigned to each VDOM, minimizing the possibility of error or fouling network communications.
By default, most FortiGate units support 10 VDOMs. Many FortiGate models support purchasing a license key to increase the maximum number.
Single firewall vs. vdoms
When VDOMs are not enabled, and the FortiGate unit is in transparent mode, all the interfaces on your unit become broadcast interfaces. The problem is there are no interfaces free for additional network segments.
![]()
A FortiGate with three interfaces means only limited network segments are possible without purchasing more FortiGate devices.
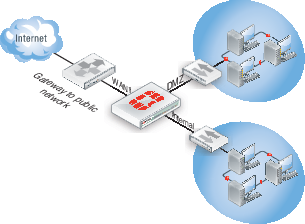
With multiple VDOMs you can have one of them configured in transparent mode, and the rest in NAT mode. In this configuration, you have an available transparent mode FortiGate unit you can drop into your network for troubleshooting, and you also have the standard.
This example shows how to enable VDOMs on the FortiGate unit and the basic and create a VDOM accounting on the DMZ2 port and assign an administrator to maintain the VDOM. First enable Virtual Domains on the FortiGate unit.
To enable VDOMs - web-based manager
- Go to System > Dashboard > Status.
- In the System Information widget, select Enable for Virtual Domain.
Note that on FortiGate-60 series and lower models, you need to enable VDOMs in the CLI only.
The FortiGate unit logs you out. Once you log back in, you will notice that the menu structure has changed. This reflects the global settings for all Virtual Domains.
To enable VDOMs - CLI
config system global
set vdom-admin enable
end
Next, add the VDOM called accounting.
To add a VDOM - web-based manager
- Go to Global > VDOM > VDOM, and select Create New.
- Enter the VDOM name
accounting. - Select OK.
To add a VDOM - CLI
config vdom
edit <new_vdom_name>
end
With the Virtual Domain created, you can assign a physical interface to it, and assign it an IP address.
To assign physical interface to the accounting Virtual Domain - web-based manager
- Go to Global > Network > Interface.
- Select the DMZ2 port row and select Edit.
- For the Virtual Domain drop-down list, select accounting.
- Select the Addressing Mode of Manual.
- Enter the IP address for the port of 10.13.101.100/24.
- Set the Administrative Access to HTTPS and SSH.
- Select OK.
To assign physical interface to the accounting Virtual Domain - CLI
config global
config system interface
edit dmz2
set vdom accounting
set ip 10.13.101.100/24
set allowaccess https ssh
next
end
Modem
FortiGate units support the use of wireless, 3G and 4G modems connected using the USB port or, if available, the express card slot. Modem access provides either primary or secondary (redundant) access to the Internet. For FortiGate units that do not include an internal modem (those units with an “M” designation), the modem interface will not appear in the web-based manager until enabled in the CLI. To enable the modem interface enter the CLI commands:
config system modem
set status enable
end
You will need to log out of the FortiGate and log back in to see the modem configuration page at System > Network > Modem. Once enabled, modem options become available by going to System > Network > Interface.
Note that the modem interface is only available when the FortiGate unit is in NAT mode.
To configure modem settings, go to System > Network > Modem.
Configuring the modem settings is a matter of entering the ISP phone number, user name and password. Depending on the modem, additional information may need to be supplied such as product identifiers, and initialization strings.
The FortiGate unit includes a number of common modems within its internal database. You can view these by selecting the Configure Modem link on the Modem Settings page. If your modem is not on the list, select Create New to add the information. This information is stored on the device, and will remain after a reboot.
Fortinet has an online database of modem models and configuration settings through FortiGuard. A subscription to the FortiGuard services is not required to access the information. As models are added, you can select the Configure Modem link and select Update Now to download new configurations.
USB modem port
Each USB modem has a specific dial-out port. This will be indicated with the documentation for your modem. To enable the correct USB port, use the CLI commands:
config system modem
set wireless-port {0 | 1 | 2}
end
To test the port, use the diagnose command:
diagnose sys modem com /1
The 1 will be the value of your USB port selected. The response will be:
Serial port: /dev/1
Press Ctrl+W to exit.
If the port does not respond the output will be:
Can not open modem device ‘/dev/1’ : Broken pipe
Modes
The FortiGate unit allows for two modes of operation for the modem; stand alone and redundant. In stand alone mode, the modem connects to a dialup ISP account to provide the connection to the Internet. In redundant mode, the modem acts as a backup method of connecting to the Internet, should the primary port for this function fails.
Configuring either stand alone or redundant modes are very similar. The primary difference is the selection of the interface that the modem will replace in the event of it failing, and the configuration of a PING server to monitor the chosen interface.
Configuring stand alone mode
Configuring stand alone mode is a matter of configuring the modem information and the dialing mode. The dial mode is either Always Connect or Dial on demand. Selecting Always Connect ensures that once the modem has connected, it remains connected to the ISP. Selecting Dial on Demand, the modem only calls the ISP if packets are routed to the modem interface. Once sent, the modem will disconnect after a specified amount of time.
To configure standalone mode as needed - web-based manager
- Go to System > Network > Modem.
- Select the Mode of Standalone.
- Select the Dial Mode of Dial on Demand.
- Select the number of redials the modem attempts if connection fails to 5.
- Select Apply.
To configure standalone mode as needed- CLI
config system modem
set status enable
set mode standalone
set auto-dial enable
set redial 5
end
Configuring redundant mode
Redundant mode provides a backup to an interface, typically to the Internet. If that interface fails or disconnects, the modem automatically dials the configured phone number(s). Once connected, the FortiGate unit routes all traffic to the modem interface until the monitored interface is up again. The FortiGate unit pings the connection to determine when it is back online.
For the FortiGate to verify when the interface is back up, you need to configure a Ping server for that interface. You will also need to configure security policies between the modem interface and the other interfaces of the FortiGate unit to ensure traffic flow.
To configure redundant mode as needed - web-based manager
- Go to System > Network > Modem.
- Select the Mode of Redundant.
- Select the interface the modem takes over from if it fails.
- Select the Dial Mode of Dial on Demand.
- Select the number of redials the modem attempts if connection fails to 5.
- Select Apply.
To configure standalone mode as needed- CLI
config system modem
set status enable
set mode redundant
set interface wan1
set auto-dial enable
set redial 5
end
Link Health Monitor
Adding a link health monitor is required for routing fail over traffic. A link health monitor will confirm the connectivity of the device’s interface
To add a link health monitor - web-based manager
- Go to Router > Static > Settings and select Create New.
For low-end FortiGate units, go to System > Network > Routing and select Create New.
- Choose a name.
- Select the Interface that will send probe requests which is the modem.
- Specify the Gateway IP address if required, if not keep it set to 0.0.0.0.
- Make sure that Health Check is enabled.
- Set the Probe Type to Ping or HTTP.
- For the Server field, enter the IP address of a server that the FortiGate unit will send ping or http requests to.
- For the Ping Interval, enter the number of seconds to send ping requests.
- For the Failover Threshold, enter the number of lost pings or http requests is acceptable before the port is determined to be down.
- Make sure to enable Update Routing Table when Gateway Detection Status Changes.
- Enable Bring Down (Up) and select the redundant interface.
- Select OK.
To add a link health monitor - CLI
config system link-monitor
edit “Example1”
set srcint <Interface_sending_probe>
set server <ISP_IP_address>
set protocol <Ping or http>
set gateway-ip <the_gateway_IP_to_reach_the_server_if_required>
set failtime <failure_count>
set interval <seconds>
set update-cascade-interface enable
set update-static-route enable
set status enable
end
Additional modem configuration
The CLI provides additional configuration options when setting up the modem options including adding multiple ISP dialing and initialization options and routing. For more information, see the CLI Reference.
Modem interface routing
The modem interface can be used in FortiOS as a dedicated interface. Once enabled and configured, you can use it in security policies and define static and dynamic routing. Within the CLI commands for the modem, you can configure the distance and priority of routes involving the modem interface. The CLI commands are:
config sysetm modem
set distance <route_distance>
set priority <priority_value>
end
For more information on the routing configuration in the CLI, see the CLI Reference. For more information on routing and configuring routing, see the Advanced Routing Guide.
FortiExtender
FortiGate units support the use of wireless, 3G and 4G modems connected to a FortiExtender which will be connected to the FortiGate unit.
Installing the 3G/4G modem
Remove the housing cover of the FortiExtender and use the provided USB extension cable to connect your 3G/4G modem to the device.
For more information on installing the 3G/4G modem, see the QuickStart Guide.
Connecting the FortiExtender unit
If you are using the provided PoE injector:
- Plug the provided Ethernet cable into the Ethernet port of the FortiExtender and insert the other end of the Ethernet cable into the AP/Bridge port on the injector, then plug the injector into an electrical outlet.
- Connect the LAN port of the PoE injector to a FortiGate, FortiWifi, or FortiSwitch device.
If you are not using the PoE injector:
- Insert the other end of the Ethernet cable into a PoE LAN port on an appropriate FortiGate, FortiWifi or FortiSwitch device.
For more information on connecting the FortiExtender unit, see the QuickStart Guide.
Once connected, your FortiGate appliance can automatically detect, connect with, and control the FortiExtender and modem via a CAPWAP tunnel.To do this, FortiExtender and FortiGate must be on the same Layer 2/3 subnet (or have DHCP relay between) and FortiGate must respond to FortiExtender’s request. In this example FortiExtender is connected to the lan interface of the FortiGate unit.
By default, FortiExtender is hidden and disabled.Enable it in FortiGate’s CLI:
config system global
set fortiextender enable
set wireless-cotnroller enable
end
The control and provisioning of Wireless Access Point (CAPWAP) service must be enabled on the port to which the FortiExtender unit is connected (lan interface in this example) using the following CLI commands:
config system interface
edit lan
append allowaccess capwap
end
Once FortiExtender is discovered and authorized, a virtual WAN interface such as fext-wan1 is created on the Fortigate.
Configuring the FortiExtender unit
At this point, you can fully manage the FortiExtender from the FortiGate unit. To achieve this, you need to authorize the FortiExtender by going to System > Network > FortiExtender and click on Authorize. Once authorized, you can configure you device as required:
Link Status: Shows you if the link is Up or Down, click on Details to see the System and Modem Status.
IP Address: Shows you the current FortiExtender’s IP address, click on the link of the IP address to connect to the FortiExtender GUI.
OS Version: Shows the current FortiExtender’s build, click on Upgrade if you wish to upgrade the Firmware.
Configure Settings: Allows you to configure the Modem Settings, PPP Authentication, General, GSM / LTE, and CDMA.
Diagnostics: Allows you to diagnose the FortiExtender unit, you can choose a command form the existing commands and click on Run.
Existing commands are: Show device info, Show data session connection status, test connection, test disconnection, Get signal strength, AT Command.
Simple output of Show device info:
Manufacturer: Sierra Wireless, Incorporated
Model: AirCard 330U
Revision: SWI9200X_03.00.08.03AP R4019 CARMD-EN-10527 2011/12/07 18:43:13
IMEI: 359615040996060
IMEI SV: 7
FSN: CDU3153118210
3GPP Release 8
+GCAP: +CGSM
OK
Modem Settings
The FortiExtender unit allows for two modes of operation for the modem; On Demand and Always Connect.
In On Demand mode, the modem connects to an ISP only upon execution of the dial up operation and disconnects only upon subsequent hang up operation from the CLI.
Syntax
To connect, run the following CLI command:
execute extender dial <SN> // <SN> is the FortiExtender's serial number.
To disconnect, run the following CLI command:
execute extender hangup <SN> // <SN> is the FortiExtender's serial number.
In Always Connect mode, the modem is always connected to the internet, it can acts as a primary or backup method of connecting to the Internet.
By default, the Fortiextender will be in Always Connect mode once authorized.
Modem Settings is a matter of configuring the dialing mode. The dial mode is either Always Connect or On demand. Selecting Always Connect ensures that once the modem has connected, it remains connected to the ISP.
To configure the dial mode as needed - web-based manager
- Go to System > Network > FortiExtender and click Configuring Settings.
- Extend Modem Settings.
- Select the Dial Mode of Always Connect or On Demand.
- Enter the Redial Limit to 5 - Only applicable in On Demand mode.
- If needed, enter the Quota Limit to the desired limit in Mega Byte -The recorded quota usage values are not persistent and lost upon rebooting Fortigate.
- Select Ok.
Configuring the FortiGate unit
In order to allow inbound and outbound traffic through the 3G/4G modem, you need to add a security policy and, depending the scenario, a static route in the FortiGate unit.
Adding a policy
If your network will be using IPv4 addresses, go to Policy & Objects > Policy > IPv4 and select Create New to add a policy that allows users on the private network to access the Internet.
In the policy, set the Incoming Interface to the internal interface and the Outgoing Interface to fext-wan1 interface. You will also need to set Source Address, Destination Address, Schedule, and Service according to your network requirements.
Make sure the Action is set to ACCEPT. Turn on NAT and make sure Use Destination Interface Address is selected. Select OK.
Always-on, redundant of wan1
No route required as in FortiOS 5.2.2 the routing shows only active routes.
Use the following CLI command to show all routes:
get router info routing-table all
Sample Output
Codes: K - kernel, C - connected, S - static, R - RIP, B - BGP
O - OSPF, IA - OSPF inter area
N1 - OSPF NSSA external type 1, N2 - OSPF NSSA external type 2
E1 - OSPF external type 1, E2 - OSPF external type 2
i - IS-IS, L1 - IS-IS level-1, L2 - IS-IS level-2, ia - IS-IS inter area
* - candidate default
S* 0.0.0.0/0 [10/0] via 172.20.120.2, wan1
C 25.49.248.0/24 is directly connected, fext-wan1
C 169.254.1.1/32 is directly connected, ssl.root
is directly connected, ssl.root
C 172.20.120.0/24 is directly connected, wan1
C 192.168.1.0/24 is directly connected, lan
Always-on, with select traffic going through the FortiExtender
In this scenario, a static route is required, if your network using IPv4 addresses, go to Router > Static > Static Routes or System > Network > Routing, depending on your FortiGate model, and select Create New. Set the Destination IP/Mask to 0.0.0.0/0.0.0.0, Device to fext-wan1, and set the Gateway to your gateway IP or to the next hop router, depending on your network requirements. Select OK.
ECMP across fext-wan1 and wan1
Go to Router > Static > Settings to configure ECMP Load Balancing Method, choose between Source IP based, Weighted Load Balance, Spillover, Source-Destination IP based and configure your settings as required.
Go to System > Network > Interfaces and edit fext-wan1, set the distance to the same distance as wan1 interface under Router > Static > Static Routes (in this example distance =10)
Now the traffic is shared between wan1 and fext-wan1 links respecting the ECMP Load Balancing Method used.
This deployment can be extrapolated for dual FortiExtender installation.
DHCP servers and relays
Note that DHCP server options are not available in transparent mode.
A DHCP server provides an address to a client on the network, when requested, from a defined address range.
An interface cannot provide both a server and a relay for connections of the same type (regular or IPsec). However, you can configure a Regular DHCP server on an interface only if the interface is a physical interface with a static IP address. You can configure an IPsec DHCP server on an interface that has either a static or a dynamic IP address.
You can configure one or more DHCP servers on any FortiGate interface. A DHCP server dynamically assigns IP addresses to hosts on the network connected to the interface. The host computers must be configured to obtain their IP addresses using DHCP.
If an interface is connected to multiple networks via routers, you can add a DHCP server for each network. The IP range of each DHCP server must match the network address range. The routers must be configured for DHCP relay.
You can configure a FortiGate interface as a DHCP relay. The interface forwards DHCP requests from DHCP clients to an external DHCP server and returns the responses to the DHCP clients. The DHCP server must have appropriate routing so that its response packets to the DHCP clients arrive at the unit.
DHCP Server configuration
To add a DHCP server, go to System > Network > Interface. Edit the interface, and select Enable for the DHCP Server row.
| DHCP Server IP | This appears only when Mode is Relay. Enter the IP address of the DHCP server where the FortiGate unit obtains the requested IP address. |
| Address Range | By default, the FortiGate unit assigns an address range based on the address of the interface for the complete scope of the address. For example, if the interface address is 172.20.120.230, the default range created is 172.20.120.231 to 172.20.120.254. Select the range and select Edit to adjust the range as needed, or select Create New to add a different range. |
| Netmask | Enter the netmask of the addresses that the DHCP server assigns. |
| Default Gateway | Select to either use the same IP as the interface or select Specify and enter the IP address of the default gateway that the DHCP server assigns to DHCP clients. |
| DNS Server | Select to use the system’s DNS settings or select Specify and enter the IP address of the DNS server. |
| Advanced... (expand to reveal more options) | |
| Mode | Select the type of DHCP server the FortiGate unit will be. By default, it is a server. Select Relay if needed. When Relay is selected, the above configuration is replaced by a field to enter the DHCP Server IP address. |
| Type | Select to use the DHCP in regular or IPsec mode. |
| MAC Address Access Control List | Select to match an IP address from the DHCP server to a specific client or device using its MAC address. In a typical situation, an IP address is assigned ad hoc to a client, and that assignment times out after a specific time of inactivity from the client, known as the lease time. To ensure a client or device always has the same IP address, that is, there is no lease time, use IP reservation. |
| Add from DHCP Client List | If the client is currently connected and using an IP address from the DHCP server, you can select this option to select the client from the list. |
DHCP in IPv6
You can use DHCP with IPv6 using the CLI. To configure DHCP, ensure IPv6 is enabled by going to System > Config > Features and enable IPv6. Use the CLI command
config system dhcp6 server
For more information on the configuration options, see the CLI Reference.
Service
On low-end FortiGate units, a DHCP server is configured, by default on the Internal interface:
| IP Range | 192.168.1.110 to 192.168.1.210 |
| Netmask | 255.255.255.0 |
| Default gateway | 192.168.1.99 |
| Lease time | 7 days |
| DNS Server 1 | 192.168.1.99 |
These settings are appropriate for the default Internal interface IP address of 192.168.1.99. If you change this address to a different network, you need to change the DHCP server settings to match.
Alternatively, after the FortiGate unit assigns an address, you can go to System > Monitor > DHCP Monitor, locate the particular user. Select the check box for the user and select Add to Reserved.
Lease time
The lease time determines the length of time an IP address remains assigned to a client. Once the lease expires, the address is released for allocation to the next client request for an IP address The default lease time is seven days. To change the lease time, use the following CLI commands:
config system dhcp server
edit <server_entry_number>
set lease-time <seconds>
end
To have an unlimited lease time, set the value to zero.
DHCP options
When adding a DHCP server, you have the ability to include DHCP codes and options. The DHCP options are BOOTP vendor information fields that provide additional vendor‑independent configuration parameters to manage the DHCP server. For example, you may need to configure a FortiGate DHCP server that gives out a separate option as well as an IP address. For example, an environment that needs to support PXE boot with Windows images.
The option numbers and codes are specific to the particular application. The documentation for the application will indicate the values to use. Option codes are represented in a option value/HEX value pairs. The option is a value 1 and 255.
You can add up to three DHCP code/option pairs per DHCP server.
To configure option 252 with value http://192.168.1.1/wpad.dat - CLI
config system dhcp server
edit <server_entry_number>
set option1 252 687474703a2f2f3139322e3136382e312e312f777061642e646174
end
For detailed information about DHCP options, see RFC 2132, DHCP Options and BOOTP Vendor Extensions.
Exclude addresses in DHCP a range
If you have a large address range for the DHCP server, you can block a range of addresses that will not be included in the available addresses for the connecting users. To do this, go to the CLI and enter the commands:
config system dhcp server
edit <server_entry_number>
config exclude-range
edit <sequence_number>
set start-ip <address>
set end-ip <address>
end
end
end
DHCP Monitor
To view information about DHCP server connections, go to System > Monitor > DHCP Monitor. On this page, you can also add IP address to the reserved IP address list.
Breaking an address lease
Should you need to end an IP address lease, you can break the lease using the CLI. This is useful if you have limited addresses, longer lease times where leases are no longer necessary. For example, with corporate visitors.
To break a lease enter the CLI command:
execute dhcp lease-clear <ip_address>
Assigning IP address by MAC address
To prevent users in the from changing their IP addresses and causing IP address conflicts or unauthorized use of IP addresses, you can bind an IP address to a specific MAC address using DHCP.
Use the CLI to reserve an IP address for a particular client identified by its device MAC address and type of connection. The DHCP server then always assigns the reserved IP address to the client. The number of reserved addresses that you can define ranges from 10 to 200 depending on the FortiGate model.
After setting up a DHCP server on an interface by going to System > Network > Interface, select the blue arrow next to Advanced to expand the options. If you know the MAC address of the system select Create New to add it, or if the system has already connected, locate it in the list, select its check box and select Add from DHCP Client List.
You can also match an address to a MAC address in the CLI. In the example below, the IP address 10.10.10.55 is assigned to MAC address 00:09:0F:30:CA:4F.
config system dhcp server
edit 1
config reserved-address
edit 1
set ip 10.10.10.55
set mac 00:09:0F:30:CA:4F
end
DNS services
A DNS server is a public service that converts symbolic node names to IP addresses. A Domain Name System (DNS) server implements the protocol. In simple terms, it acts as a phone book for the Internet. A DNS server matches domain names with the computer IP address. This enables you to use readable locations, such as fortinet.com when browsing the Internet. FortiOS supports DNS configuration for both IPv4 and IPv6 addressing.
The FortiGate unit includes default DNS server addresses. However, these should be changed to those provided by your Internet Service Provider. The defaults are DNS proxies and are not as reliable as those from your ISP.
Within FortiOS, there are two DNS configuration options; each provide a specific service, and can work together to provide a complete DNS solution.
DNS settings
Basic DNS queries are configured on interfaces that connect to the Internet. When a website is requested, for example, the FortiGate unit will look to the configured DNS servers to provide the IP address to know which server to contact to complete the transaction.
DNS server addresses are configured by going to System > Network > DNS. Here you specify the DNS server addresses. Typically, these addresses are supplied by your ISP. An additional option is available if you have local Microsoft domains on the network, by entering a domain name in the Local Domain Name field.
In a situation where all three fields are configured, the FortiGate unit will first look to the local domain. If no match is found, a request is sent to the external DNS servers.
If virtual domains are enabled, you create a DNS database in each VDOM. All of the interfaces in a VDOM share the DNS database in that VDOM.
Additional DNS CLI configuration
Further options are available from the CLI with the command config system dns. Within this command you can set the following commands:
dns-cache-limit- enables you to set how many DNS entries are stored in the cache. Entries that remain in the cache provide a quicker response to requests than going out to the Internet to get the same information.dns-cache-ttl- enables you to set how long entries remain in the cache in seconds, between 60 and 86,400 (24 hours).cache-notfound-responses- when enabled, any DNS requests that are returned with NOTFOUND can be stored in the cache.source-ip- enables you to define a dedicated IP address for communications with the DNS server.
DNS server
You can also create local DNS servers for your network. Depending on your requirements, you can manually maintain your entries (master DNS server), or use it as a jumping point, where the server refers to an outside source (slave DNS server). A local master DNS server works similarly to the DNS server addresses configured in System > Network > DNS, but all entries must be added manually. This enables you to add a local DNS server to include specific URL/IP address combinations.
The DNS server options are not visible in the web-based manager by default. To enable the server, go to System > Config > Features and select DNS Database.
While a master DNS server is an easy method of including regularly used addresses to save on going to an outside DNS server, it is not recommended to make it the authoritative DNS server. IP addresses may change, and maintaining any type of list can quickly become labor-intensive.
A FortiGate master DNS server is best set for local services. For example, if your company has a web server on the DMZ that is accessed by internal employees as well as external users, such as customers or remote users. In this situation, the internal users when accessing the site would send a request for website.example.com, that would go out to the DNS server on the web, to return an IP address or virtual IP. With an internal DNS, the same site request is resolved internally to the internal web server IP address, minimizing inbound/outbound traffic and access time.
As a slave, DNS server, the FortiGate server refers to an external or alternate source as way to obtain the url/IP combination. This useful if there is a master DNS server for a large company where a list is maintained. Satellite offices can then connect to the master DNS server to obtain the correct addressing.
The DNS server entries does not allow CNAME entries, as per RFC 1912, section 2.4.
To configure a master DNS server - web-based manager
- Go to System > Network > DNS Server, and select Create New for DNS Database.
- Select the Type of Master.
- Select the View as Shadow.
- The view is the accessibility of the DNS server. Selecting Public, external users can access, or use, the DNS server. Selecting Shadow, only internal users can use it.
- Enter the DNS Zone, for example,
WebServer. - Enter the domain name for the zone, for example
example.com. - Enter the hostname of the DNS server, for example,
Corporate. - Enter the contact address for the administrator, for example,
admin@example.com. - Set Authoritative to Disable.
- Select OK.
- Enter the DNS entries for the server by selecting Create New.
- Select the Type, for example, Address (A).
- Enter the Hostname, for example
web.example.com. - Enter the remaining information, which varies depending on the Type selected.
- Select OK.
To configure a DNS server - CLI
config system dns-database
edit WebServer
set domain example.com
set type master
set view shadow
set ttl 86400
set primary-name corporate
set contact admin@exmple.com
set authoritative disable
config dns-entry
edit 1
set hostname web.example.com
set type A
set ip 192.168.21.12
set status enable
end
end
Recursive DNS
You can set an option to ensure these types of DNS server is not the authoritative server. When configured, the FortiGate unit will check its internal DNS server (Master or Slave). If the request cannot be fulfilled, it will look to the external DNS servers. This is known as a split DNS configuration.
You can also have the FortiGate unit look to an internal server should the Master or Slave not fulfill the request by using the CLI commands:
config system dns-database
edit example.com
...
set view shadow
end
For this behavior to work completely, for the external port, you must set the DNS query for the external interface to be recursive. This option is configured in the CLI only.
To set the DNS query
config system dns-server
edit wan1
set mode recursive
end
Dynamic DNS
If your ISP changes your external IP address on a regular basis, and you have a static domain name, you can configure the external interface to use a dynamic DNS service to ensure external users and/or customers can always connect to your company firewall.
If you have a FortiGuard subscription, you can use FortiGuard as your DDNS server. To configure dynamic DNS in the web-based manager, go to System > Network > DNS, select Enable FortiGuard DDNS, and enter the relevant information for the interface communicating to the server, and which server to use, and relevant information.
If you do not have a FortiGuard subscription, or want to use an alternate server, you can configure dynamic DNS in the CLI use the commands below. Within the CLI you can configure a DDNS for each interface. Only the first configured port appears in the web‑based manager. Additional commands vary with the DDNS server you select.
config system ddns
edit <instance_value>
set monitor-interface <external_interface>
set ddns-server <ddns_server_selection>
end
You can also use FortiGuard (when subscribed) as a DDNS as well. To configure, use the CLI commands:
config system fortiguard
set ddns-server-ip
set ddns-server-port
end
FortiClient discovery and registration
FortiOS provides a means of allowing users running FortiClient Endpoint Control software to connect to specific interfaces when connecting to the FortiGate unit. As well as ensuring that remote or local users have FortiClient Endpoint Control software installed on their PC or mobile device.
FortiClient discovery
You can configure a FortiGate interface as an interface that will accept FortiClient connections. When configured, the FortiGate unit sends broadcast messages which the FortiClient software running on an end user PC is listening for.
To enable the broadcast message
- Go to System > Network > Interface.
- Edit the interface to send the broadcast messages.
- Select FCT-Access.
- In Device Management, select Broadcast Discovery Messages.
- Select OK.
Once enabled, the FortiGate unit broadcasts a discovery message that includes the IP address of the interface and listening port number to the local network. All PCs running FortiClient on that network listen for this discovery message.
You also have the option of including a registration key. When the FortiClient discovers the FortiGate unit, it is prompted to enter a registration key, defined by the administrator.
To add a registration key
- Go to System > Config > Advanced.
- Select Enable Registration Key for FortiClient, and enter the key.
- Select Apply.
Ensure you distribute the key to the users that need to connect to the FortiGate unit.
FortiClient Registration
On the end user side, if FortiClient has not been registered with the FortiGate unit, it is continually listening for the FortiGate discovery message. When this message is detected the un-registered client will pop-up a FortiGate Detected message. The user can choose to either register or ignore the message.
Clients that have registered with that FortiGate unit will not be listening for these messages and will not display the message again.
If you enabled the registration key, the user is prompted to enter the key before a connection can be completed.
|
|
There can be some confusion when discussing the compatibility of FortiClient with FortiGate. There is technical compatibility and licensing compatibility. FortiClient software may not be licence compatible with previous versions of FortiOS. For instance, while FortiClient 5.2 software is technologically compatible with a FortiGate running FortiOS 5.0 firmware. A FortiGate running FortiOS 5.0 will not recognize the FortiClient 5.2 licence code. Depending on the restrictions of your particular situation, you can:
|
For more information on FortiGate registration, see the FortiClient Administration Guide.
IP addresses for self-originated traffic
On the FortiGate unit, there are a number of protocols and traffic that is specific to the internal workings of FortiOS. For many of these traffic sources, you can identify a specific port/IP address for this self-originating traffic. The following traffic can be configured to a specific port/IP address:
- SNMP
- Syslog
- alert email
- FortiManager connection IP
- FortiGuard services
- FortiAnalyzer logging
- NTP
- DNS
- Authorization requests such as RADIUS
- FSSO
Configuration of these services is performed in the CLI. In each instance, there is a command set source-ip. For example, to set the source IP of NTP to be on the DMZ1 port with an IP of 192.168.4.5, the commands are:
config system ntp
set ntpsync enable
set syncinterval 5
set source-ip 192.168.4.5
end
To see which services are configured with source-ip settings, use the get command:
get system source-ip status
The output will appear similar to the sample below:
NTP: x.x.x.x
DNS: x.x.x.x
SNMP: x.x.x.x
Central Management: x.x.x.x
FortiGuard Updates (AV/IPS): x.x.x.x
FortiGuard Queries (WebFilter/SpamFilter): x.x.x.x
Administration for schools
For system administrator in the school system it is particularly difficult to maintain a network and access to the Internet. There are potential legal liabilities if content is not properly filtered and children are allowed to view pornography and other non-productive and potentially dangerous content. For a school, too much filtering is better than too little. This section describes some basic practices administrators can employ to help maintain control without being too draconian for access to the internet.
Security policies
The default security policies in FortiOS allow all traffic on all ports and all IP addresses. Not the most secure. While applying UTM profiles can help to block viruses, detect attacks and prevent spam, this doesn’t provide a solid overall security option. The best approach is a layered approach; the first layer being the security policy.
When creating outbound security policies, you need to know the answer to the question “What are the students allowed to do?” The answer is surf the web, connect to FTP sites, send/receive email, and so on.
Once you know what the students need to do, you can research the software used and determine the ports the applications use. For example, if the students only require web surfing, then there are only two ports (80 - HTTP and 443 - HTTPS) needed to complete their tasks. Setting the security policies to only allow traffic through two ports (rather than all 65,000), this will significantly lower any possible exploits. By restricting the ports to known services, means stopping the use of proxy servers, as many of them operate on a non-standard port to hide their traffic from URL filtering or HTTP inspection.
DNS
Students should not be allowed to use whatever DNS they want. this opens another port for them to use and potentially smuggle traffic on. The best approach is to point to an internal DNS server and only allow those devices out on port 53. Its the same approach one would use for SMTP. Only allow the mail server to use port 25 since nothing else should be sending email.
If there is no internal DNS server, then the list of allowed DNS servers they can use should be restrictive. One possible exploit would be for them to set up their own DNS server at home that serves different IPs for known hosts, such as having Google.com sent back the IP for playboy.com.
Encrypted traffic (HTTPS)
Generally speaking, students should not be allowed to access encrypted websites. Encrypted traffic cannot be sniffed, and therefore, cannot be monitored. HTTPS traffic should only be allowed when necessary. Most websites a student needs to access are HTTP, not HTTPS. Due to the nature of HTTPS protocol, and the fact that encryption is an inherent security risk to your network, its use should be restricted.
Adding a security policy that encompasses a list of allowed secure sites will ensure that any HTTPS sites that are required are the only sites a student can go to.
FTP
For the most part, students should not be using FTP. FTP is not HTTP or HTTPS so you cannot use URL filtering to restrict where they go. This can be controlled with destination IPs in the security policy. With a policy that specifically outlines which FTP addresses are allowed, all other will be blocked.
Example security policies
Given these requirements, an example set of security policies could look like the following illustration. In a large setup, all the IPs for the students are treated by one of these four policies.
Simple security policy setup

The last policy in the list, included by default, is a deny policy.This adds to the potential of error that could end up allowing unwanted traffic to pass. The deny policy ensures that any traffic making it to this point is stopped. It can also help in further troubleshooting by viewing the logs for denied traffic.
With these policies in place, even before packet inspection occurs, the FortiGate, and the network are fairly secure. Should any of the UTM profiles fail, there is still a basic level of security.
UTM security profiles
Antivirus profiles
Antivirus screening should be enabled for any service you have enabled in the security policies. In the case above, HTTP, FTP, as well as POP3 and SMTP (assuming there is email access for students). There is not a virus scan option for HTTPS, because the content is encrypted. Generally speaking, most of the network traffic will be students surfing the web.
To configure antivirus profiles in the web-based manager, go to Security Profiles > Antivirus, or use the CLI commands under config antivirus profile.
Web filtering
The actual filtering of URLs - sites and content - should be performed by FortiGuard. It is easier and websites are constantly being monitored, and new ones reviewed and added to the FortiGuard databases every day. The FortiGuard categories provide an extensive list of offensive, and non-productive sites.
As well, there are additional settings to include in a web filtering profile to best contain a student’s web browsing.
- Web URL filtering should be enabled to set up exemptions for websites that are blocked or reasons other than category filtering. It also prevents the use of IP addresses to get around web filtering.
- Block invalid URLs - HTTPS only. This option inspects the HTTPS certificate and looks at the URL to ensure it’s valid. It is common for proxy sites to create an HTTPS certificate with a garbage URL. If the site is legitimate, it should be set up correctly. If the site approach to security is to ignore it, then their security policy puts your network at risk and the site should be blocked.
Web filtering options are configured in the web-based manager by going to Security Profiles > Web filter, or in the CLI under config webfilter profile.
Advanced options
There are a few Advanced options to consider for a web filtering profile:
- Enable Provide details for blocked HTTP 4xx and 5xx errors. Under normal circumstances there are exploits that can be used with 400 and 500 series messages to access the website. While most students probably won’t know how to do this, there is no harm in being cautious. It only takes one.
- Enable Rate Images by URL. This option only works with Google images. It examines the URL that the images is stored at to get a rating on it, then blocks or allows the image based on the rating of the originating URL. It does not inspect the image contents. Most image search engines to a prefect and pass the images directly to the browser.
- Enable Block HTTP redirects by rating. An HTTP redirect is one method of getting around ratings. Go to one website that has an allowed rating, and it redirects to another website that may want blocked.
Categories and Classifications
For the selection of what FortiGuard categories and classifications that should be blocked, that is purely based on the school system and its Internet information policy.
Email Filtering
Other than specific teacher-led email inboxes, there is no reason why a student should be able to access, read or send personal email. Ports for POP3, SMTP and IMAP should not be opened in a security policies.
IPS
The intrusion protection profiles should be used to ensure the student PCs are not vulnerable to attacks, nor do you want students making attacks. As well, IPS can do more than simple vulnerability scans. With a FortiGuard subscription, IPS signatures are pushed to the FortiGate unit. New signatures are released constantly for various intrusions as they are discovered.
FortiOS includes a number of predefined IPS sensors that you can enable by default. Selecting the all_default signature is a good place to start as it includes the major signatures.
To configure IPS sensors in the web-based manager, go to Security Profiles > Intrusion Protection, on the CLI use commands under config ips sensor.
Application control
Application control uses IPS signatures to limit the use of instant messaging and peer-to-peer applications which can lead to possible infections on a student’s PC. FortiOS includes a number of pre-defined application categories. To configure and maintain application control profiles in the web-based manager, go to Security Profiles > Application Control. In the CLI use commands under config application list.
Some applications to consider include proxies, botnets, toolbars and P2P applications.
Logging
Turn on all logging - every option in this section should be enabled. This is not where you decide what you are going to log. It is simply defining what the UTM profiles can log.
Logging everything is a way to monitor traffic on the network, see what student’s are utilizing the most, and locate any potential holes in your security plan. As well, keeping this information may help to prove negligence later in necessary.
Replacement messages list
The replacement message list in System > Config > Replacement Messages.
The replacement messages list enables you to view and customize replacement messages. Use the expand arrow beside each type to display the replacement messages for that category. Select the Edit icon beside each replacement message to customize that message for your requirements.
Should you make a major error to the code, you can select the Restore Default to return to the original message and code base.
If you are viewing the replacement messages list in a VDOM, any messages that have been customized for that VDOM are displayed with a Reset icon that you can use to reset the replacement message to the global version.
For connections requiring authentication, the FortiGate unit uses HTTP to send an authentication disclaimer page for the user to accept before a security policy is in effect. Therefore, the user must initiate HTTP traffic first in order to trigger the authentication disclaimer page. Once the disclaimer is accepted, the user can send whatever traffic is allowed by the security policy.
Replacement message images
You can add images to replacement messages to:
- Disclaimer pages
- Login pages
- Declined disclaimer pages
- Login failed page
- Login challenge pages
- Keepalive pages
Image embedding is also available to the endpoint NAC download portal and recommendation portal replacement messages, as well as HTTP replacement messages.
Supported image formats are GIF, JPEG, TIFF and PNG. The maximum file size supported is 6000 bytes.
Adding images to replacement messages
To upload an image for use in a message
- Go to System > Config > Replacement Messages.
- Select Manage Images at the top of the page.
- Select Create New.
- Enter a Name for the image.
- Select the Content Type.
- Select Browse to locate the file and select OK.
The image that you include in a replacement message, must have the following html:
<img src=%%IMAGE: <config_image_name>%% size=<bytes> >
For example:
<img src=%%IMAGE: logo_hq%% size=4272>
Modifying replacement messages
Replacement messages can be modified to include a message or content that suits your organization.
Use the expand arrows to view the replacement message list for a given category. Messages are in HTML format. To change a replacement message, go to System > Config > Replacement Messages select the replacement message that you want to modify. At the bottom pane of the window, you can see the message on one side and the HTML code on the other side. The message view changes in real-time as you change the content.
A list of common replacement messages appears in the main window. To see the entire list and all categories of replacement messages, in the upper-right corner of the window, select Extended View.
Alert Mail replacement messages
The FortiGate unit adds the alert mail replacement messages listed in the following table to alert email messages sent to administrators. If you enable the option Send alert email for logs based on severity, whether or not replacement messages are sent by alert email depends on how you set the alert email in Minimum log level.
Authentication replacement messages
The FortiGate unit uses the text of the authentication replacement messages for various user authentication HTML pages that are displayed when a user is required to authenticate because a security policy includes at least one identity-based policy that requires firewall users to authenticate.
These replacement message pages are for authentication using HTTP and HTTPS. You cannot customize the firewall authentication messages for FTP and Telnet.
The authentication login page and the authentication disclaimer include replacement tags and controls not found on other replacement messages.
Users see the authentication login page when they use a VPN or a security policy that requires authentication. You can customize this page in the same way as you modify other replacement messages.
There are some unique requirements for these replacement messages:
- The login page must be an HTML page containing a form with
ACTION="/"andMETHOD="POST" - The form must contain the following hidden controls:
<INPUT TYPE="hidden" NAME="%%MAGICID%%" VALUE="%%MAGICVAL%%"><INPUT TYPE="hidden" NAME="%%STATEID%%" VALUE="%%STATEVAL%%"><INPUT TYPE="hidden" NAME="%%REDIRID%%" VALUE="%%PROTURI%%">- The form must contain the following visible controls:
<INPUT TYPE="text" NAME="%%USERNAMEID%%" size=25><INPUT TYPE="password" NAME="%%PASSWORDID%%" size=25>
Example
The following is an example of a simple authentication page that meets the requirements listed above.
<HTML><HEAD><TITLE>Firewall Authentication</TITLE></HEAD>
<BODY><H4>You must authenticate to use this service.</H4>
<FORM ACTION="/" method="post">
<INPUT NAME="%%MAGICID%%" VALUE="%%MAGICVAL%%" TYPE="hidden">
<TABLE ALIGN="center" BGCOLOR="#00cccc" BORDER="0"
CELLPADDING="15" CELLSPACING="0" WIDTH="320"><TBODY>
<TR><TH>Username:</TH>
<TD><INPUT NAME="%%USERNAMEID%%" SIZE="25" TYPE="text"> </TD></TR>
<TR><TH>Password:</TH>
<TD><INPUT NAME="%%PASSWORDID%%" SIZE="25" TYPE="password"> </TD></TR>
<TR><TD COLSPAN="2" ALIGN="center" BGCOLOR="#00cccc">
<INPUT NAME="%%STATEID%%" VALUE="%%STATEVAL%%" TYPE="hidden">
<INPUT NAME="%%REDIRID%%" VALUE="%%PROTURI%%" TYPE="hidden">
<INPUT VALUE="Continue" TYPE="submit"> </TD></TR>
</TBODY></TABLE></FORM></BODY></HTML>
Captive Portal Default replacement messages
The Captive Portal Default replacement messages are used for wireless authentication only. You must have a VAP interface with the security set as captive portal to trigger these replacement messages.
Device Detection Portal replacement message
The FortiGate unit displays the replacement message when the FortiGate unit cannot determine the type of BYOD or handheld device is used to connect the network.
Email replacement messages
The FortiGate unit sends the mail replacement messages to email clients using IMAP, POP3, or SMTP when an event occurs such as antivirus blocking a file attached to an email that contains a virus. Email replacement messages are text messages.
If the FortiGate unit supports SSL content scanning and inspection these replacement messages can also be added to IMAPS, POP3S, and SMTPS email messages.
Endpoint Control replacement message
The FortiGate unit displays the replacement message when the FortiClient Endpoint Security software is not installed or registered correctly with the FortiGate unit.
FTP replacement messages
The FortiGate unit sends the FTP replacement messages listed in the table below to FTP clients when an event occurs such as antivirus blocking a file that contains a virus in an FTP session. FTP replacement messages are text messages.
FortiGuard Web Filtering replacement messages
The FortiGate unit sends the FortiGuard Web Filtering replacement messages listed in the table to web browsers using the HTTP protocol when FortiGuard web filtering blocks a URL, provides details about blocked HTTP 4xx and 5xx errors, and for FortiGuard overrides. FortiGuard Web Filtering replacement messages are HTTP pages.
If the FortiGate unit supports SSL content scanning and inspection and if Protocol Recognition > HTTPS Content Filtering Mode is set to Deep Scan in the antivirus profile, these replacement messages can also replace web pages downloaded using the HTTPS protocol.
HTTP replacement messages
The FortiGate unit sends the HTTP replacement messages listed in the following table to web browsers using the HTTP protocol when an event occurs such as antivirus blocking a file that contains a virus in an HTTP session. HTTP replacement messages are HTML pages.
If the FortiGate unit supports SSL content scanning and inspection, and if under HTTPS in the protocol option list has Enable Deep Scan enabled, these replacement messages can also replace web pages downloaded using the HTTPS protocol.
IM replacement messages
The FortiGate unit sends the IM replacement messages listed in to IM clients using AIM, ICQ, MSN, or Yahoo! Messenger when an event occurs such as antivirus blocking a file attached to an email that contains a virus. IM replacement messages are text messages.
NNTP replacement messages
The FortiGate unit sends the NNTP replacement messages listed in the following table to NNTP clients when an event occurs such as antivirus blocking a file attached to an NNTP message that contains a virus. NNTP replacement messages are text messages.
Spam replacement messages
The FortiGate unit adds the Spam replacement messages listed in the following table to SMTP server responses if the email message is identified as spam and the spam action is discard. If the FortiGate unit supports SSL content scanning and inspection these replacement messages can also be added to SMTPS server responses.
NAC quarantine replacement messages
The page that is displayed for the user depends on whether NAC quarantine blocked the user because a virus was found, a DoS sensor detected an attack, an IPS sensor detected an attack, or a DLP rule with action set to Quarantine IP address or Quarantine Interface matched a session from the user.
The default messages inform the user of why they are seeing this page and recommend they contact the system administrator. You can customize the pages as required, for example to include an email address or other contact information or if applicable a note about how long the user can expect to be blocked.
SSL VPN replacement message
The SSL VPN login replacement message is an HTML replacement message that formats the FortiGate SSL VPN portal login page. You can customize this replacement message according to your organization’s needs. The page is linked to FortiGate functionality and you must construct it according to the following guidelines to ensure that it will work.
- The login page must be an HTML page containing a form with
ACTION="%%SSL_ACT%%"andMETHOD="%%SSL_METHOD%%" - The form must contain the
%%SSL_LOGIN%%tag to provide the login form. - The form must contain the
%%SSL_HIDDEN%%tag.
Web Proxy replacement messages
The FortiGate unit sends Web Proxy replacement messages listed in the table below when a web proxy event occurs that is detected and matches the web proxy configuration. These replacement messages are web pages that appear within your web browser.
The following web proxy replacement messages require an identity-based security policy so that the web proxy is successful. You can also enable FTP-over-HTTP by selecting the FTP option in System > Network > Explicit Proxy.
Traffic quota control replacement messages
When user traffic is going through the FortiGate unit and it is blocked by traffic shaping quota controls, users see the Traffic shaper block message or the Per IP traffic shaper block message when they attempt to connect through the FortiGate unit using HTTP.
The traffic quota HTTP pages should contain the %%QUOTA_INFO%% tag to display information about the traffic shaping quota setting that is blocking the user.
MM1 replacement messages
MM1 replacement messages are sent when, during MMS content scanning, FortiOS Carrier detects, for example a virus, using the MMS profile.
You must have Remove Blocked selected within the MMS profile if you want to remove the content that is intercepted during MMS scanning on the FortiGate unit.
MM3 replacement messages
MM3 replacement messages are sent when, during MMS content scanning, FortiOS Carrier detects, for example a virus, using the MMS profile.
You must have Remove Blocked selected within the MMS profile if you want to remove the content that is intercepted during MMS scanning on the unit.
MM4 replacement messages
MM4 replacement messages are sent when, during MMS content scanning, FortiOS Carrier detects, for example a virus, using the MMS profile.
MM7 replacement messages
MM7 replacement messages are sent when, during MMS content scanning, FortiOS Carrier detects, for example a virus, using the MMS profile.
MMS replacement messages
The MMS replacement message is sent when a section of an MMS message has been replaced because it contains a blocked file. This replacement message is in HTML format.
The message text is:
<HTML><BODY>This section of the message has been replaced because it contained a blocked file</BODY></HTML>
Replacement message groups
Replacement message groups enable you to view common messages in groups for large carriers. Message groups can be configured by going to Config > Replacement Message Group.
Using the defined groups, you can manage specific replacement messages from a single location, rather than searching through the entire replacement message list.
If you enable virtual domains (VDOMs) on the FortiGate unit, replacement message groups are configured separately for each virtual domain. Each virtual domain has its own default replacement message group, configured from System > Config > Replacement Messages Group.
When you modify a message in a replacement message group, a Reset icon appears beside the message in the group. You can select this Reset icon to reset the message in the replacement message group to the default version.
All MM1/4/7 notification messages for FortiOS Carrier (and MM1 retrieve-conf messages) can contain a SMIL layer and all MM4 notification messages can contain an HTML layer in the message. These layers can be used to brand messages by using logos uploaded to the FortiGate unit via the 'Manage Images' link found on the replacement message group configuration page.
Disk
To view the status and storage information of the local disk on your FortiGate unit, go to System > Config > Advanced. The Disk menu appears only on FortiGate units with an internal hard or flash disk.
Formatting the disk
The internal disk of the FortiGate unit (if available) can be formatted by going to System > Config > Advanced and selecting Format.
Formatting the disk will erase all data on it, including databases for antivirus and IPS; logs, quarantine files, and WAN optimization caches. The FortiGate unit requires a reboot once the disk has been formatted.
Setting space quotas
If the FortiGate unit has an internal hard or flash disk, you can allocate the space on the disk for specific logging and archiving, and WAN optimization. By default, the space is used on an as required basis. As such, a disk can fill up with basic disk logging, leaving less potential space for quarantine.
By going to System > Config > Advanced, you can select the Edit icon for Logging and Archiving and WAN Optimization & Web Cache and define the amount of space each log, archive and WAN optimization has on the disk.
CLI Scripts
To upload bulk CLI commands and scripts, go to System > Config > Advanced.
Scripts are text files containing CLI command sequences. Scripts can be used to deploy identical configurations to many devices. For example, if all of your devices use identical security policies, you can enter the commands required to create the security policies in a script, and then deploy the script to all the devices which should use those same settings.
Use a text editor such as Notepad or other application that creates simple text files. Enter the commands in sequence, with each line as one command, similar to examples throughout the FortiOS documentation set.
If you are using a FortiGate unit that is not remotely managed by a FortiManager unit or the FortiGuard Analysis and Management Service, the scripts you upload are executed and discarded. If you want to execute a script more than once, you must keep a copy on your management PC.
If your FortiGate unit is configured to use a FortiManager unit, you can upload your scripts to the FortiManager unit, and run them from any FortiGate unit configured to use the FortiManager unit. If you upload a script directly to a FortiGate unit, it is executed and discarded.
If your FortiGate unit is configured to use FortiGuard Analysis and Management Service, scripts you upload are executed and stored. You can run uploaded scripts from any FortiGate unit configured with your FortiGuard Analysis and Management Service account. The uploaded script files appear on the FortiGuard Analysis and Management Service portal website.
Uploading script files
After you have created a script file, you can then upload it through System > Config > Advanced. When a script is uploaded, it is automatically executed.
Commands that require the FortiGate unit to reboot when entered in the command line will also force a reboot if included in a script.
To execute a script
- Go to System > Config > Advanced.
- Verify that Upload Bulk CLI Command File is selected.
- Select Browse to locate the script file.
- Select Apply.
If the FortiGate unit is not configured for remote management, or if it is configured to use a FortiManager unit, uploaded scripts are discarded after execution. Save script files to your management PC if you want to execute them again later.
If the FortiGate unit is configured to use the FortiGuard Analysis and Management Service, the script file is saved to the remote server for later reuse. You can view the script or run it from the FortiGuard Analysis and Management Service portal website.
Rejecting PING requests
The factory default configuration of your FortiGate unit allows the default external interface to respond to ping requests. Depending on the model of your FortiGate unit the actual name of this interface will vary. For the most secure operation, you should change the configuration of the external interface so that it does not respond to ping requests. Not responding to ping requests makes it more difficult for a potential attacker to detect your FortiGate unit from the Internet. One such potential threat are Denial of Service (DoS) attacks.
A FortiGate unit responds to ping requests if ping administrative access is enabled for that interface.
To disable ping administrative access - web-based manager
- Go to System > Network > Interface.
- Choose the external interface and select Edit.
- Clear the Ping Administrative Access check box.
- Select OK.
In the CLI, when setting the allowaccess settings, by selecting the access types and not including the PING option, that option is then not selected. In this example, only HTTPS is selected.
To disable ping administrative access - CLI
config system interface
edit external
set allowaccess https
end
Opening TCP 113
Although seemingly contrary to conventional wisdom of closing ports from hackers, this port, which is used for ident requests, should be opened.
Port 113 initially was used as an authentication port, and later defined as an identification port (see RFC 1413). Some servers may still use this port to help in identifying users or other servers and establish a connection. Because port 113 receives a lot of unsolicited traffic, many routers, including on the FortiGate unit, close this port.
The issue arises in that unsolicited requests are stopped by the FortiGate unit, which will send a response saying that the port is closed. In doing so, it also lets the requesting server know there is a device at the given address, and thus announcing its presence. By enabling traffic on port 113, requests will travel to this port, and will most likely, be ignored and never responded to.
By default, the ident port is closed. To open it, use the following CLI commands:
config system interface
edit <port_name>
set ident_accept enable
end
You could also further use port forwarding to send the traffic to a non-existent IP address and thus never have a response packet sent.
Obfuscate HTTP responses
The FortiGate unit can obfuscate the HTTP responses from the FortiGate admin GUI and SSL VPN servers. By default this option is not enabled. To obfuscate HTTP headers, use the following CLI command:
config system global
set http-obfuscate {none | header-only | modified | no-error}
end
Where:
none — do not hide the FortiGate web server identity.
header-only — hides the HTTP server banner.
modified — provides modified error responses.
no-error — suppresses error responses.
Copyright © 2018 Fortinet, Inc. All Rights Reserved. | Terms of Service | Privacy Policy
